Wednesday, June 7, 2017

Cloth Diapering


Cloth Diapering


 So, my due date has come and gone. As I sit here thinking about my sweet baby boy, obviously too warm and cozy to make his appearance right now, I think about all the preparation we have done to get ready to meet him and kiss his little face. The room is ready, the clothes are washed, the baby showers have been thrown, and the rearranging of baby room has happened at least 5 times, the maternity pics have been taken, the bags are packed, the house is clean and ready for the 100th time and yet we wait. This extra time is allowing me to wrap up some posts I have been trying to write for the past month! 

     I have wanted to use cloth diapers since the beginning of this pregnancy for a few reasons. Economically and environmentally are just to name a few. But mainly can you imagine wearing plastic around your butt all day and night? Ha-me either. So in this quest and desire to use cloth diapers, I spent the better part of 8 months online, researching the best diapers. As you know the internet is a dark hole to go down, and though I found a lot of information, I found myself more confused than ever. After all, I didn’t want or need designer cloth diapers that cost a fortune. I just wanted some simple cloth diapers and most of all, I wanted an actual person to tell me what to do! I found a local shop in my home town that embraced me and ALL my questions. All the ladies working there, cloth diapered their own children as well. They had a lot of practical advice that I was so thankful for. Way better than those terrible online forums! So without further ado here are the items I picked up from the store. I will keep you posted on how I like them and if they work out for our family. 
These are the items I purchased at the store. I got 6 water proof liners, 36 OzoCozy Pre-fold diapers, Allen's Natural laundry detergent, two dry pail reusable liners, Snappi diaper fasteners, reusable diaper liners, and disposable diaper liners.


 These Stay Dry liners are used as extra absorbency during times like naps where you want them to stay asleep a little longer.

These Diaper Liners are great for outings and traveling. they are disposable and can line the inside of your cloth diaper.

 My husband and I have practiced diapering some stuffed animals and find that these little Snappis are super easy to use. So grateful we dont have to use safety pins anymore!

 Allen's Naturals is a fantastic laundry soap that is highly concentrated. Therefore a little goes a long way! It is important to use a great laundry soap so your diapers dont build up residue which will impact their ability to aborb. We dnt want that!

 
 It is important to use a diaper rash cream that specifically says safe to use on cloth diapers. Some of the typical creams will damage the diapers ability to absorb.


This is my dry pail, wet pails
 are no longer needed, which is good news for you and me! I purchased two reusable liners and a normal laundry basket
 from target with plenty of air holes in it.


 I have a feeling this will be our best friend!


This is a diaper sprayer that connects to our toilet and allows for us to simply spray the diapers down. We don't have to shake the poopies into the toilet or dunk them in the water. We simply spray them and then put them in the dry pail.


I was reading that depending on how many diapers your have you can easily wash them every two-three days. I bought 36 diapers so I think I will be washing about every 2 days. I will let you know how that goes!


Once I had all the items I needed finally, I had to prewash the diapers! They recommend 3-5 washes before using them. This helps them become absorbent. They start off just like flat pieces of cloth. But as you wash and dry them you can actually see them become fluffier and puffier.

This is a new adventure for us, thank you for joining us on the journey as we start from seed!

***UPDATE***
   My little man decided to make his appearance the night I wrote this and it has been a whirlwind. I am just now able to publish this and I cant help but laugh a little as I re read it! So far my cloth diapering journey has been slow to start and bleak. However, I have used them a few times and I do like them. For me, the first month was absolutely crazy and everything was new and foreign, I could not imagine trying to figure this out as well. But I have used them, so I will give my feed back for them.
     My guy pees A LOT!!! Therefore he gets wet very quickly and he is not a fan of being wet. I use the water proof shell and despite the amount of pee, they have not leaked. Which is actually more than I can say for the disposable diapers. On days where we are home all day, I often use the cloth. Someday soon I may use them when we leave the house! These are so bulky, I found them very hard to use in the beginning when he was so little. Clothes often didn't fit over them, and when they did he looked a little ridiculous! The diaper balm has been fantastic, he loves it, and it has kept any and all diaper rash at bay. We love the diaper sprayer that attaches to the toilet, it is worth every penny! the snappi fasteners have been very friendly to use. I only got his little leg one time with them and he let me know!! The ends are like little teeth meant to dig into the fabric or anything they come in contact with.
   I have definitely not given up on cloth diapers, I look forward to using them more and more as he gets older.
   Funny how I thought it would just be so easy and economical! Real life hit fast, and sometimes you just have to be flexible and go with the flow! Luckily my co workers had thrown me a "diaper" baby shower a week before he was born, and we got TONS of disposable diapers. Otherwise we literally would have had NO disposable diapers. I was so sure I would be cloth diapering full time that I didn't even buy ONE box!! Oh man, you live and you learn I guess!
As you can see there is always plenty to learn when starting from seed! Visit my website for more starting from seed moments!


Sunday, February 19, 2017

How to keep your green onions from going limp!


This is the best way to keep your green onions from going limp!

 I’m sure I am not alone when I say I hate unnecessary trips to the grocery store especially for ONE item---which I already bought!!!--- That went bad!! Some produce is just not meant to withstand the fridge, but yet still needs to be in there. So what are you to do?

I have researched and tried many methods to keep my green onions fresh longer. I found the perfect method for me, I can’t wait for you to try it and experience fresh, crisp, green onions for weeks to come. 


I have three methods to show you 
  1. Place the green onions in your fridge by themselves  
       2.      Place the green onions roots side down in a glass jar filled with about an inch of water and  cover  with a zip lock bag
  3. .Roll the green onion bunch in a paper towel and place in a gallon size zip lock bag, zip it but leave about 1/3 of it unzipped.*
             
      *This trick also works with a head of lettuce. (Peel the leaves off, wash the lettuce, let dry and roll in paper towel trying not to have the leaves touch, place in a gallon zip lock). 


DAY ONE

I put some of the bunch (roots down) in 1-2 inches of water and covered with a zip lock bag. I kept them in the door of the refrigerator. I put some of the bunch directly on the shelf of the fridge, and then I wrapped the remaining bunch in a paper towel and placed in a zip lock bag zipped about 2/3 of the way.


 3 DAYS LATER


 Had I left these just on the shelf in the fridge you can see I would be running to the store to get more. The green onions in the water didn't do too bad, I only lost a few. The bunch on the right looks like I just bought them!


  ONE WEEK LATER

 These were the green onions on the shelf. As you can see they did not fair well!
Again, the water wasn't the worst method. I did lose some green onions, but still have some to use!
AND THE WINNER IS... wrapping them in paper towel and placing in a zip lock bag. I only lost two strands! 


I hope you try my new favorite method to keeping your green onions fresh and crispy! 

Monday, January 23, 2017

Acupuncture Helped Me!


 I have lived with ovarian cysts for many years of my life. I went to my regular yearly checkups complaining of pain during (ah-em) sex and horrible periods. (I mean horrible!!!) My pain was dismissed and they gave me everything in the book to help with the painful intercourse , and suggested birth control to control the periods. So not knowing better, I tried nearly everything the doctors suggested and the only results were continued pain, weight gain, irritability and a sense of numbness to the world (birth control side effects for sure!)

After two years of this nonsense, they thought they felt a cyst on my ovary during one of my routine exams, so I was shuttled off to the ultrasound. There, they found a softball size cyst (obviously the reason for the painful intercourse). They couldn’t believe I wasn’t in more pain. They recommended Vicodin for the pain and surgery to avoid contortion of my ovary. Of course I went with the surgery. During surgery they removed the cyst and found a copious amount of endometriosis and scraped that out as well. They said the bad periods were likely caused by the endometriosis. So after the surgery and the recovery time, I found intercourse less painful and more manageable periods.

Almost two years later, I was in Texas for a convention, and I had the worst- I mean- I think I might need to go to the hospital or maybe I am having a miscarriage kind of period. It hadn’t been that bad since high school. Upon returning home, I found out that the cyst had reared its ugly head once again. Only this time there were a few more with it. I had one BIG one on one ovary and two smaller ones on the other ovary. I am told once again that surgery and Vicodin are my only choices. Was this really going to be my life every two years?? I had no idea the cyst would return after surgery the first time. I did not want to accept this as the new norm for me. I had started looking at more holistic approaches, but was skeptical. Would it really help? Would it really work? Uh----hello, surgery didn’t! So why would I do that again and what did I have to lose?!  At least if I tried something new it might not work, but what if it does!!! So, I asked my doc about a holistic approach, and to my surprise she recommended an acupuncturist in town that specializes in women’s health and fertility. WOW! Are you kidding me? I was so surprised that she didn’t laugh at me and then she actually gave a referral. Thank you!! She did suggest given the size of the cyst that I have regular ultrasounds done at her office while I was doing the acupuncture. That way she could monitor them, and if surgery was still needed we could do that. I was all in. 

A week later, I had my first appointment with the acupuncturist. Keep in mind, I was still new to this idea (and a skeptic) but I went in with an open mind. She asked me many questions about myself, my food habits, she looked at my tongue, took my pulse etc. She suggested that since the cysts were so big already, that we take an aggressive approach and meet every week until they were gone. She was sure to remind me that, given the stage of the cyst I may still need surgery and then I would need to see her after for prevention and maintenance. She also said the main difference between Western Medicine and Chinese medicine is that Western medicine wants a quick fix; a band aid per se. Chinese medicine is about prevention and maintenance. It isn’t a quick fix and patience is necessary. With all of that said, I started seeing her once a week in September. 

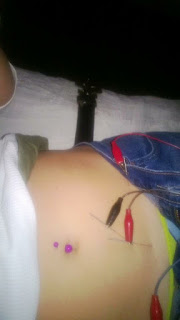
After going for about a month, I returned to my regular doctor. Ultrasound showed the cysts had not changed. Remembering what the acupuncturist said about patience, I continued to see her despite not seeing immediate results. The appointments with the acupuncturist lasted about an hour each session and they consisted of her checking in on me, and putting about 12-15 needles from head to toe, including my belly. She also hooked the needles in my belly up to a machine that simulated movement of the needles ( in China women would twist the needles between their fingers to help stimulate the process even more) obviously that is very time consuming, so the machine did the work. It felt like a warm vibration throughout my body. Very cool actually!
In the first few weeks of starting Acupuncture.

 I also took a special herb that she gave me. I went back to my regular doctor a month later (end of Nov. ) and still cysts were there and in fact, I now had more little ones. I felt deflated and thought for sure acupuncture was silly and not going to work for me. My doctor recommended that we book a surgery date for the beginning of Jan.  We would do one more ultrasound in December, and if still no change then we would have the surgery date set. Feeling the worst scenario was coming true, I continued to go to acupuncture through December. I went in for my final ultrasound and low and behold… the little ones were all gone and the big one had shrunk considerably. I no longer needed surgery! I was so excited. 

I continued to go acupuncture every other week to continue the prevention and I stopped taking the herb. I decided that I wanted to go to my regular doctor every 6 weeks for an ultrasound and follow up to see if there was any re occurrence. During that time the cysts stayed manageable if not gone completely. I did notice that they tended to come back cyclically (during my periods) but never in the size or volume that they had before. Come June, I decided that acupuncture was for me! I stopped the regular ultrasounds and was happy knowing if I felt good everything was good!

 I have now been going to her once a month for about 3 years.  In that time, my cysts have become a non-issue, sex has felt better than ever, my periods are like clockwork (well, before I got pregnant :) ) with hardly any pain before or during, and she has since then helped me with some fertility issues. More on that later! I highly encourage you if you struggle with woman's health and fertility to research acupuncture as an option. I sure am glad I did. Please feel free to comment below with your story, or any questions you may have for me.
Check out more posts on my website 

Monday, January 9, 2017

Simple Starter Smoothie

Ever wanted to start drinking smoothies? Ever feel overwhelmed with ingredients, recipes, bad blenders, and where to even start? I did too! Honestly, for me I started making smoothies regularly when two things happened. First, I got a Vitamix blender for Christmas from my sister! I never knew how easy making a smoothie was until I got this blender. A-MA-ZING! Before I had a terrible blender that could hardly chop up spinach let alone hunks of frozen fruit or almost whole veggies. I literally would get all my ingredients in the blender turn it on and it would shake and spin right off the counter if I wasn't careful. It looked like it was doing a whole lot, but no blending of ingredients was actually taking place.  Frustrated, I put the idea of making smoothies on the shelf. Then came along the Vitamix! My world was turned upside down. I could blend ANYTHING!  I started looking at recipes and was quickly overwhelmed with the amount of ingredients that went into them. Having them all on hand and finding a recipe that I wanted to chance all my ingredients on was proving to be harder than I thought. Then, thanks to my girls once again at Revita5, I learned simple and tasty recipes that I could master. Once I learned them and loved them, I could build off of them, add, and tweak my recipes with limited failure. It was so much fun and so tasty. I love starting my morning off with a serving of fruits and vegetables. For the past two years this has been my morning routine, and after about a year or so, I finally got my husband to drink them every morning as well. This is a WIN WIN! I always have these simple ingredients on hand and no longer have to measure anything out! I thought you might appreciate a simple starter smoothie, even if you have been making smoothies for awhile, everyone could add this simple recipe to their arsenal. Make sure to check out my website for more recipes and ideas.


Simple Starter Smoothie

What you need
*serves 2 or 1 big one
2 cups of  unsweetened almond milk (try my homemade almond milk)
 ( If you buy your almond milk, I recommend Califia brand) 
A big handful of spinach
1 cup of frozen fruit ( can use fresh as well)
1 banana


Step One: Add 2 cups of almond milk ( can use regular milk, coconut milk, hemp milk etc. We just love it with my homemade almond milk) to the blender, follow with a handful of spinach, about 1 cup of frozen fruit (I used blueberries), plop in one banana. (I added 1 teaspoon of Chia seeds on this particular morning.)

 Step Two:  Blend. I start off on a slower speed and work my way up to high. Make sure it is well blended. If smoothie doesn't seem to mix well, add a little more liquid until it starts to blend together.


Step Three: Pour into a glass and enjoy. This recipe usually makes enough to fill two, 16oz. mason jars.

Feel free to play with this recipe. Don't be scared, ANY fruit will do. You can change spinach out for kale, try different milks. I have even used avocado or oatmeal flour (ground up oats) in place of bananas when in a pinch. This is only the start of a beautiful journey to feeling more vivacious in the morning!

Saturday, January 7, 2017

Simpler Times

Simpler Times


Have you noticed that kids' toys have changed over the years? They used to be simple and fostered creativity and imagination. These days you can only find high action, light up toys that over stimulate even me! Kids are no longer encouraged to use their imagination, the toy does it for them.  My husband and I often crave a slower more simpler time and as we wait for the arrival of our first child, our conversations often turn to the toys and activities we want our child playing with regularly. So instead of just pining for this lost past time we decided to recreate it. My husband is pretty handy if I do say so myself, so he got to work and created this adorable, simple wooden toy truck, first in it's fleet. We look forward to adding more wooden toys to the collection. I would love to hear your feed back on the toys today and what you do as a family to help stimulate creativity and imagination for your children.


Thursday, January 5, 2017

Snowy day Hot Chocolate!

I don't know about you, but when the snow finally starts falling all I want is a tasty cup of creamy warm hot chocolate! Today is one of those days. First snow day of the school year, my dog and I cuddling together by the fire (yea, just kidding, no fire, but a girl can dream!), and I can't get hot chocolate off my brain! Those hot chocolate packets are what I used to reach for (and still do in a true snow day emergency) but lately I have been wanting something tasty and also not terrible for me. Sometimes that is a hard combo to find. But with inspiration from the girls at Revita5, I now have an (almost) perfect recipe for just that!! It is not as sweet as the traditional stuff in a packet, but it is so creamy and delicious it is my go to Snow day Hot chocolate!!! I use my homemade almond milk in this recipe, but you can use store bought, or regular milk. Whatever you have on hand, because hello! it is a snow day, which means you are staying in your pajamas at home all day! I still tweak this every time I make it, looking for the perfect recipe, but this is pretty close!


What you need
*serves one
1 cup of my homemade almond milk
1 tablespoon of vanilla
2 tablespoons of 100% cacao powder (you can add more depending on how chocolatey you want it.)
1-2 tablespoons of honey (depends on your desired sweetness level)
* original recipe called for maca powder, I have not tried this yet. But you can play around with it!


Add all ingredients to a blender and blend. Taste test and see if you need to add more cacao powder or honey for desired sweetness or chocolate goodness!


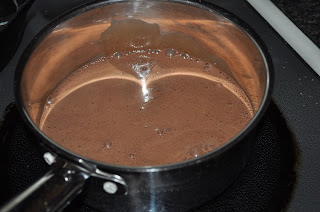
 heat over the stove, but don't let it boil.


Pour into your favorite snow day mug and enjoy!

*this tastes a little different than your traditional hot chocolate, but so worth it and WAY better for you. Plus you get the added benefits from the almond milk and the cacao powder.